Hello dear users! Our service, Instajet.io, presents a fantastic way of increasing your Instagram revenue by integrating ads into your content. To start getting requests, all you need to do is complete a simple registration procedure. This step-by-step guide is designed to help you with that process to ensure that your cooperation with Instajet.io is easy from day one!
Converting to Instagram Business profile
First, you need to make sure that your Instagram account is set to “business.” Don’t worry, you can do it anytime with a couple of taps!
To switch your profile to a business account:
1. Go to your profile and tapin the upper right corner.
2. Tap Settings.
3. For some accounts, the Switch to Professional Account option will be listed directly under Settings.
4. Tap Account.
5. Tap Switch to Professional Account.
6. Tap Continue.
7. Select a Category for your business and tap Done.
8. Tap OK to confirm.
9. Tap Business.
10. Tap Next.
11. Add Contact details and tap Next. Or tap Don’t use my contact info to skip this step.
12. If you'd like, you can follow the steps to connect your business account to a Facebook Page associated with your business. This step is optional and will make it easier to use all of the features available for businesses across the Meta family of apps. Currently, only one Facebook Page can be connected to your business account.
13. Tap X on the top right corner to return to your profile.
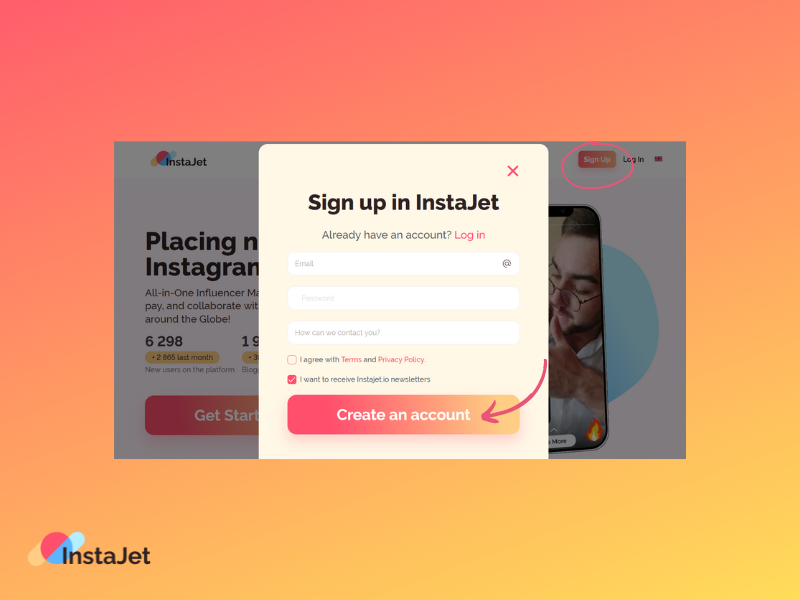
Registering on Instajet.io
Now that you’ve successfully converted your profile to a business one, you need to make a profile with Instajet.io. Just click on the “Sign up” button in the top right corner and fill in the form with your email and desired password. Simple as that!
Creating an Influencer Account
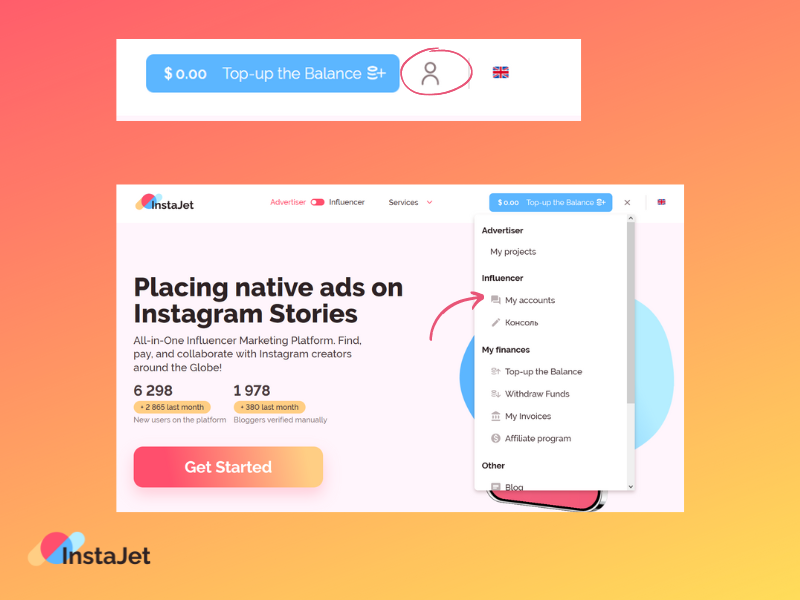
After you’ve registered, all you need to do is click on the silhouette icon in the top right corner and select “My accounts” from the pop-up menu. That will lead you to Your Accounts tab, where you’ll need to click on the “Add an Account” button, as shown below.

Registration: Page one
Registering your account with Instajet.io is a three-step procedure. Step one should be familiar to you as an Instagram user - all you need to do is just fill in the info you have on your profile page on Instagram. This includes:
1. Account avatar (profile picture)
2. Account name
3. Link to the account
4. Account topic
5. Account description
6. Gender
7. Language
8. Country and City
Registration: Page two
Here’s where things get a little more intricate. To match your profile with the best-fitting advertisers and get you on the way to higher earnings, Instajet.io needs to know a few things about your target audience and profile stats.

1. First, you need to write in the number of your subscribers. We do realize this number tends to change, so just keep in mind that currently your account needs to have over 2 thousand subscribers to pass moderation.
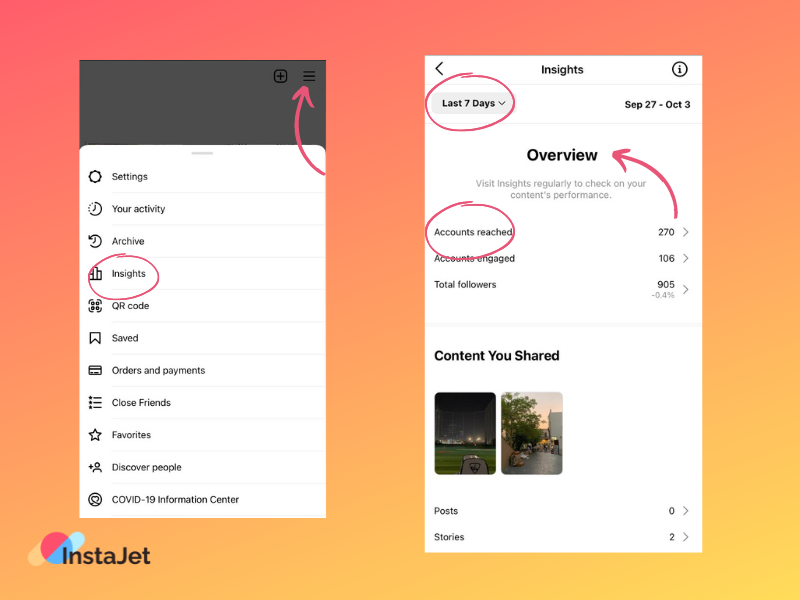
2. Next, you’ll have to provide some screenshots. Note that we’re asking the stats from the past 7 days - no need to increase the time frame. Here’s how to do it: from your profile tab, click on the three dashes in the upper right corner of your screen, and select "Insights". Here you can choose the time frame within the past 90 days at the top of the page. Once again, we only ask for the stats from the past 7.
3. After setting the time frame, click the “Accounts reached” line under the Overview tab. This will take you to the following screen:
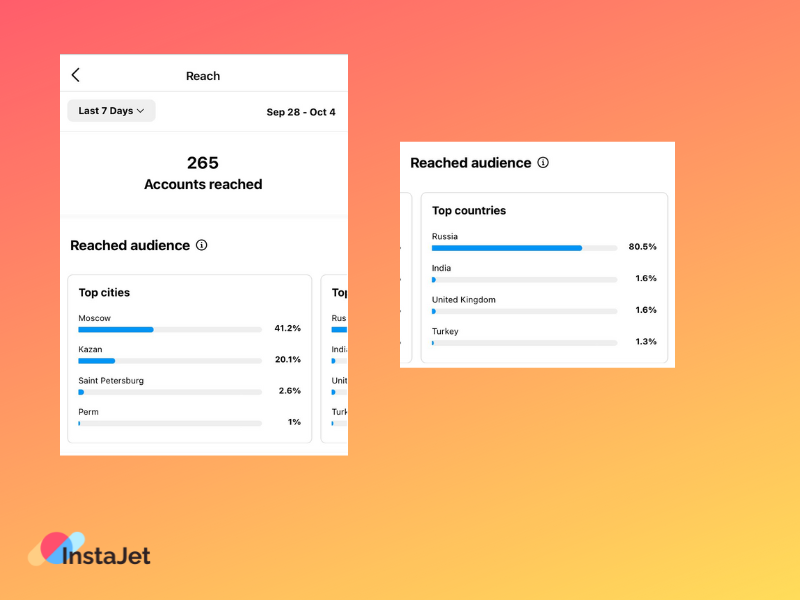
You’re almost there! Scroll to the “Reached audience” section and take screenshots of the top-3 cities, countries, and age ranges, as well as the gender diagram:

4. Lastly, you’ll need to insert a screenshot with your Stories Statistics. To do that, go back to the Insights screen, and scroll down to the “Content you Shared” section. There, you will find the “Stories” button. Tap on it, and you’ll be transferred to the screen with all the statistics on the stories you’ve posted. Take a screenshot, it should look something like this:

Registration: Page three
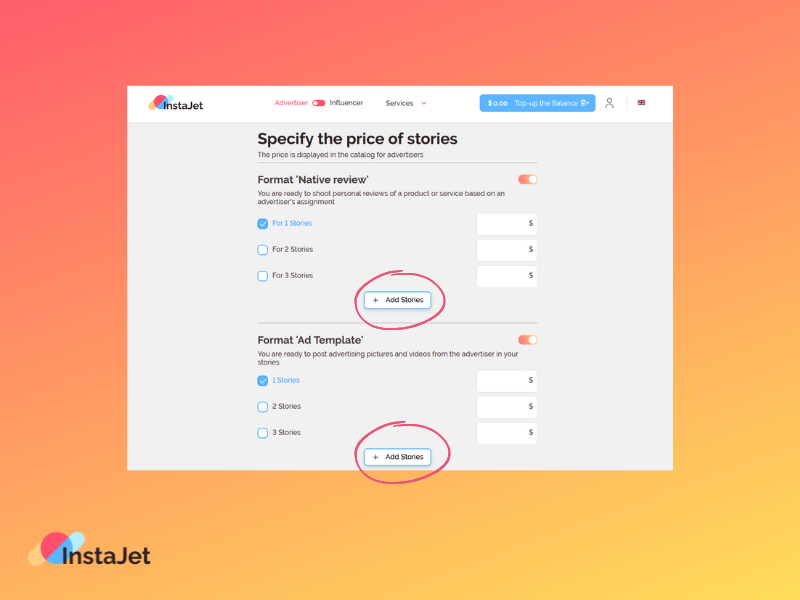
Here, you’re supposed to provide potential advertisers with your prices. You can choose whether you’re willing to do “Native reviews” - that is, shoot personal reviews of a product or service in your unique style and form; or “Ad Templates” - which means posting advertising pictures and videos directly from the advertiser in your stories. You can also do both! Note that you can put pricings for up to 5 stories - simply keep clicking on the “Add stories” button below.
Congratulations!
You’re all set and ready to receive your first assignment from an advertiser! InstaJet.io takes within 24 hours to moderate your account, and then you’ll start receiving requests. Welcome aboard!
Are there any questions left?
Please contact our technical support via the website or email info@instajet.io. We will be happy to help!